Sunday, April 17, 2016

Design of motor mount for brake


Initially, my plan was to use Acrylic and laser cutter to make a motor mount (last picture) . But after running the FEA, I found that safety factor of 0.88 for the design and material would not support the amount of forces that it must endure during the operation. I went ahead and make a simple mount ( L-shape mount) design using the A36 steel and 0.25 in thickness. Everything went very smoothly with the help of Alex helping me welding the plates together. the mount have safety factor of 5 and is very strong.

Inline image 1

Developing Code for Brake


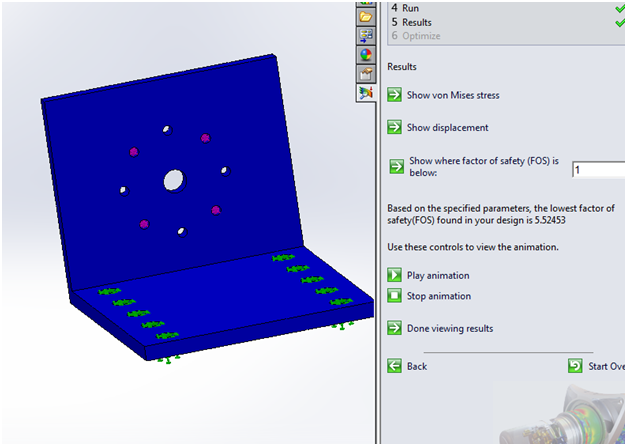
This is the program that we have been working on to control the brake using the servo initially via an Arduino Uno.

   #include <Servo.h>
    const int trigPin = 9;
    const int echoPin = 10;
    Servo myservo;
    int pos = 0;
    // defines variables
    long duration;
    long distance;
    void setup() {
    pinMode(trigPin, OUTPUT); // Sets the trigPin as an Output
    pinMode(echoPin, INPUT); // Sets the echoPin as an Input
    Serial.begin(9600); // Starts the serial communication
    myservo.attach (8);

  }
    void loop() {
   
    // Clears the trigPin
    digitalWrite(trigPin, LOW);
    delayMicroseconds(2);
    // Sets the trigPin on HIGH state for 10 micro seconds
    digitalWrite(trigPin, HIGH);
    delayMicroseconds(10);
    digitalWrite(trigPin, LOW);
    // Reads the echoPin, returns the sound wave travel time in microseconds
    duration = pulseIn(echoPin, HIGH);
    // Calculating the distance
    distance= duration*0.034/2;
    // Prints the distance on the Serial Monitor
    Serial.print("Distance: ");
    Serial.println(distance);


  int am = 7;
  if (am < distance){

    for(pos = 0; pos < 180; pos += 1)  // goes from 0 degrees to 180 degrees
  {                                  // in steps of 1 degree
    myservo.write(pos);              // tell servo to go to position in variable 'pos'
       delay(15);                    // waits 15ms for the servo to reach the position
  }
  }

  else {
  for(pos = 180; pos>=1; pos-=1)     // goes from 180 degrees to 0 degrees
  {                              
    myservo.write(pos);              // tell servo to go to position in variable 'pos'
        delay(15);                    // waits 15ms for the servo to reach the position
  }
  }
    }

Disc Brake Mount Adapter for hub-motor 408 series

Inline image 1
We are having difficulty in obtaining a hub-motor with a mount for the disc brake. Therefore, I went ahead to create a solid work file of the disc brake mount adapter onto the hub-motor 408 series that we are getting. The only problem is to make this mount we need special tool and mold that can cast the mount correctly.
Inline image 2

Choosing location for Disc Brake


After many considerations, we finalize to install the disc brake next to the hub-motor as the previous year team did. The location is very convenient and directly applied to the main propulsion power. Another alternative is to install the disc brake on the outside of the red brake since it is spacious and directly applied brake to the large driving wheels. However, we need to consider making the  supporting arms that can hold the calipers firmly when applying brake.
Displaying  Displaying

Monday, October 5, 2015

Update ( assignment # 3)
After presentation on last Wednesday, I learned more about assertive presentation style from the internet and other groups' presentations since I lacked the visual concept of the model. I watched the video for the sample presentation but when  I put together my own presentation, I thought about simplicity and kept everything very concise to two slides. I realized that i need more visual aspects to easy my speech during my presentation. So hopefully, I will improve on the next presentation.

After class, I did some research on electric braking and how it works. Electric braking is using the similar set up as drum brake. When the electricity is connecting to the conductor wires inside the magnet, brake magnet becomes magnetizes and attract to the drum face. The contract between two surfaces creates the friction and rotate the actuating arm which push the shoes outward against the drum. The drum retards the rotation of the shaft and eventually the outer wheels.
Components of an Electric Brake
https://www.hitchweb.com/blog/post/2013/01/07/how-electric-brakes-work

Sunday, September 20, 2015

Updating ( blog assignment #2)

Update
From last Wednesday meeting,  we looked at our concept designs and discussed the advantages and disadvantages of our sketches. one of the things we agree on was creating a small track on the top of bogie system and use the hydraulic actuator to raise extra arms to use as steering guide-way. However, some of us learned from Dr. Furman that we will be modifying the existing bogie system and railway. We were constraints on the exploring the new designs since the existing steering mechanism is fully developed and there is very little changes we can improve on. After that, we discussed with fail/safe team and get some of their ideas on what their thought about the bogie system. I learned from one team member that he wanted to use the bogie system similar to roller coaster as a fail/safe. We brainstormed even further into what changes that can improve the system significantly and we agreed on reducing vibration and noise during the operation.


Idea:

I have been doing research and read more into old project reports from previous years for steering mechanism design. I tried to figure out the significant changes that can improve the steering mechanism even further without altering the structure of the system. One of the important things that last year reported was designing of a system can keep the steering wheels firmly pressed against the surface of the track. Since the wheels on steering mechanism are adjustable but they do not provide any type of active adjustment to hold them securely on the track. After doing some search, the only option that I can think of is using stronger actuator on the steering mechanism to create more force applying on the steering wheels, making sure that the wheels do not disengage from the surface of the track. Furthermore, I thought of magnet strips that can be installed inside the steering wheels and on the inside surface of the track to act as an passive system for keeping the wheels align and securely engaging on the course.